
I’ve been setting up a Server 2012 R2 / Windows 8.1 lab and that lab naturally includes running Hyper-V. In the process of setting up and testing Hyper-V, I wanted to try the Shared Nothing Live Migration I had heard about. I went to the Hyper-V Manager and right clicked on the VM and clicked Move…
After a few screens, I found that I got the following error message.
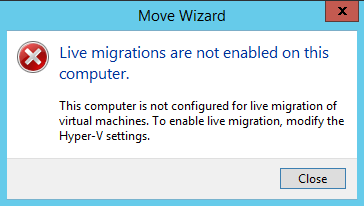
Yep, “Live migrations are not enabled on this computer“. That seemed bizarre to me but after some quick searching, I found that this was because my Hyper-V server wasn’t joined to a domain, which happens to be a requirement for live migrations. So, I joined the server to the domain and rebooted.
Again, I tried the same steps to move the virtual machine, and yet again I get the “Live migrations are not enabled on this computer” screen. Now I was really confused since I thought I had already met the requirements.
As it turns out, you need to do the following in Hyper-V Manager:
- Right click on your Hyper-V server in the list, and select Hyper-V Settings…
- Select the Live Migrations feature
- Check the box that says Enable incoming and outgoing live migrations
- Choose an Incoming live migrations option
- In my case, I chose Use any available network for live migration
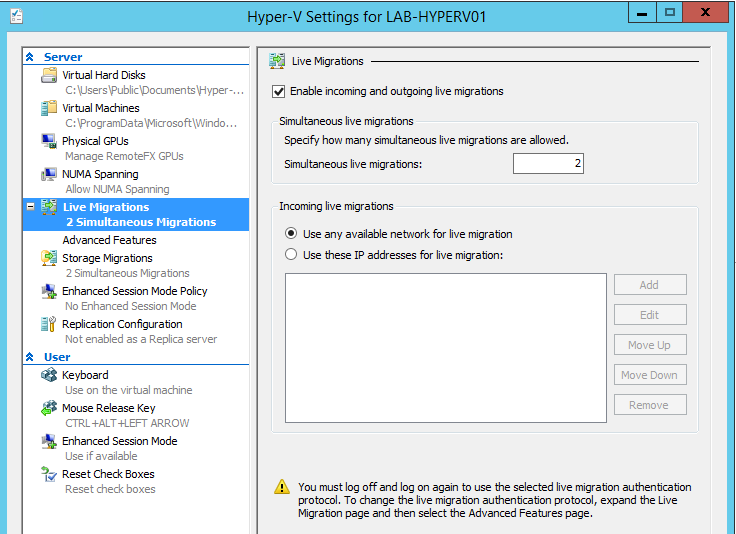
Now, you might think that you’re done, except for the warning at the bottom of the screen there that says:
[callout] You must log off and log on again to use the selected live migration authentication protocol. To change the live migration authentication protocol, expand the Live Migration page and then select the advanced Features page.[/callout]
As it turns out, the default settings on the Advanced Features page aren’t really all that exciting unless you have network adapters that support Remote Direct Memory Access (RDMA) so you can actually just click Apply and you’re good to go!
As usual, if you have any questions, I love to answer them, so feel free to commend below. Thanks!
Recent Comments